Showing posts with label makeup. Show all posts

November Favourites


Soo.. this is my first ever favorites post and I plan to do them at the end of every month so that I can share with you the new things that I tried and liked for that month. Hope you enjoy them and find them helpful. Also feel free to tell me about your favorite products in the comments. A lot of products in this post will be from Avon because I have loved and used their products for years but now because I started my blog I’ll try to use products from a lot of different brands (mostly drugstore) p.s. I finally made an instagram account (programmerstyle) so now you can follow me there too :D

1. Makeup favorites

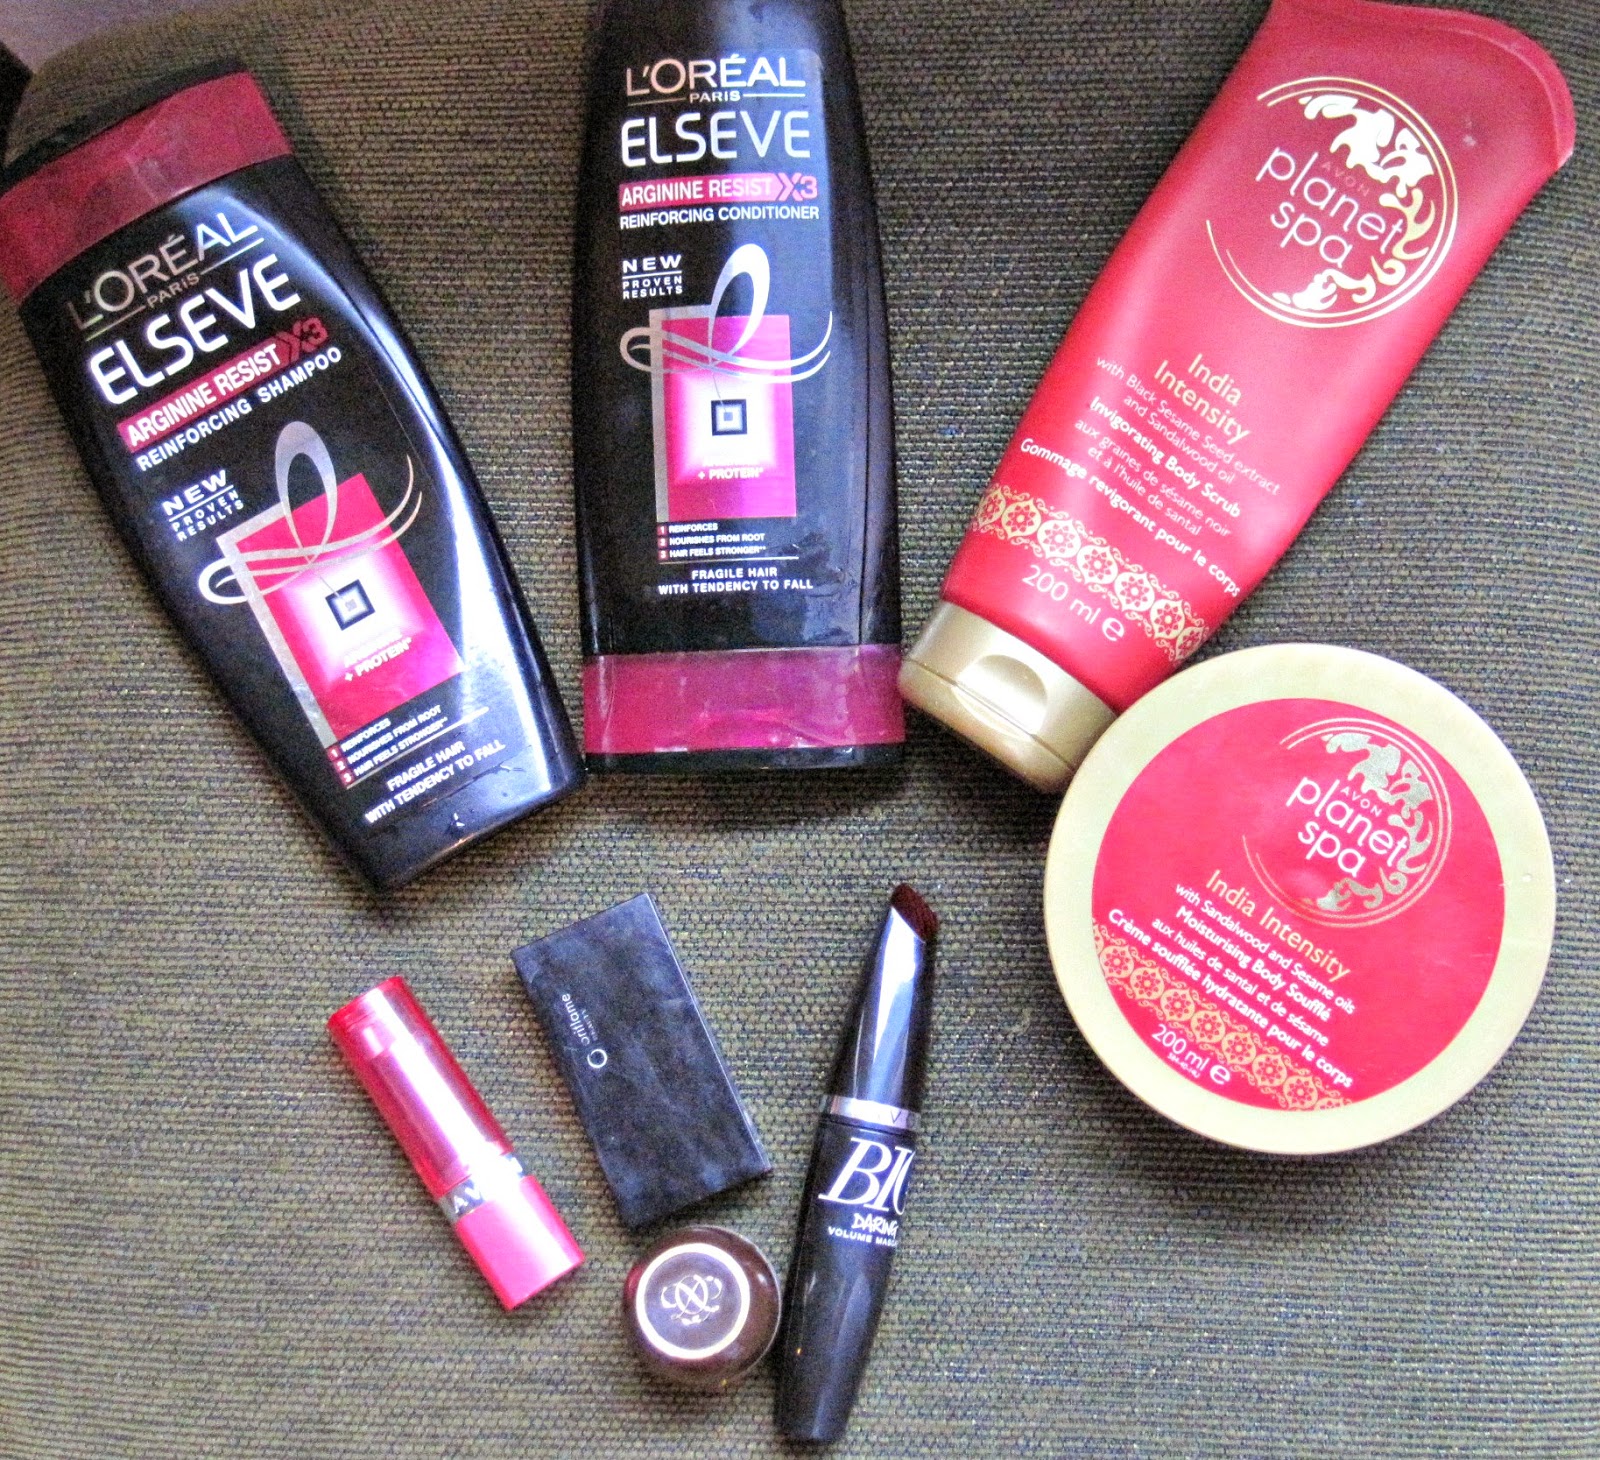
-Avon Big&Daring volume mascara: I’ve tried a lot of different Avon mascaras and this is the only one that managed to impress me besides their Luxe one. I have small eyelashes and this mascara makes them look a lot bigger. It gives volume since it’s a volume mascara but in my opinion it can also count as a decent lengthening mascara too. I have it in black. ($9 currently by one get one half off)
-Avon Ultra Color Absolute Lipstick in Tender mauve: First of all this lipstick has different packaging on Avon’s site so I think the color of the packaging depends of the country you live in. This is my favorite “everyday” lipstick color. It’s the perfect mix of brown, pink and purple tones + it doesn’t feel drying on the lips at all. I am deeply recommending this lipstick to you. ($9 currently $5.99)
-Oriflame Beauty Eyebrow Kit: This kit is an all time favorite because I have used it for a year and still can’t find something that I will like more. (that’s why it looks grouse on the picture). I prefer to use eye shadow to fill in my brows than a pencil and this kit is amazing. It has two small brushes which do their job amazing, 2 shadows (light and dark brown) and wax. I just love it!
-Oriflame Universal Cream- Tender Care: This is a universal cream that I only use as a lip balm so I don’t know if it really counts as a makeup product. This smells amazing I have it in chocolate, I’ve also used the caramel one and they also have a coconut one that smells amazing. Not do they smell great but they make your lips very smooth too.

2. Skincare (Bath & Shower)

-Planet  Spa India Intensity Invigorating Body Scrub with Black Sesame Seed extract and Sandalwood oil: This is the body scrub from Avon’s Planet Spat range that I’m currently using. (but I’ve tried different ones and I must say I like all of them). I really like the scent of it and it leaves your bath smelling very good when your done showering. It’s a gentle scrub so you can use it every time you shower.
-Planet Spa India Intensity Body Butter with Black Sesame Seed extract and Sandalwood oil: I like my body scrub and body butter to smell the same I guess. Again amazing scent, this body butter moisturizes  your skin very nicely and lives it feeling soft :D

3.  Hair

-L'Oréal Paris Elvive Arginine ResistX3 Shampoo and Conditioner: First don’t worry my hair isn’t falling but it’s really damaged and it’s breaking that’s why I decided to give these shampoo and conditioner a try (and JLo’s commercial). I mean they are good shampoo and conditioner considering their price. They sure made my hair feel and look better than before when I didn’t use them and as a bonus they make the hair smell lovely.


Review Friday

Review: Avon Ultra Color Lipstick
I use and enjoy a lot of Avon products so for my first review I decided to do a review on Avon's signature lipsticks, their ultra color lipsticks. I like Avon products because they are really good quality for the amount of money that you are paying. However I found out that they are a little bit more expensive in the States than here (maybe is because of the different standards). Being priced at 8$, I think that you should definitely try them.

First of all let's talk about the packaging before we start to talk about the actual product. The packaging of these lipsticks looks and feels so nice. I mean it's plastic but it's very good quality considering I have mine lipsticks for a long time and the packing is still in awesome condition.

Now let's talk about the product. I think for the money these are one of the best lipsticks out their. They are very nice pigmented and their formula isn't bad either. I have tried: Naturally Nude, Wine With Everything, Perfect Red and Carnation (I think they should be more creative with their names :P). 
1.      Naturally Nude is marked as a soft matt formula which I don't think is true because to me, it has more satin than matt appearance. As the name says it's a nude lipstick. Although it's a very nice color to use in the center of your lips so you would make your lips appear bigger, I wouldn't suggest you to use it on their own because it can make you look dead. Maybe you should try to use it with a darker lip pencil and see how it would look.
2.      Wine With Everything is a satin lipstick as well as Perfect Red and Carnation. The color of this lipstick is so pretty and perfect for fall, but my problem with it is that because it's a satin lipstick it appears so much lighter on the lips than it actually is. I think they should have made it a matt lipstick or made it a little bit darker. However I think it would look stunning on girls with pale skin.
3.      Perfect Red also a satin lipstick is my go-to red lipstick. It’s a dark red color which looks good on everyone. It's more on the yellow side so maybe I would love it even more if it was more on the blue side. The same thing with this one is that although I use it all the time I think they should have made it matt.
4.      Carnation again a satin lipstick is a light pink lipstick. It looks to me like baby pink mixed with coral tones color. On me I like it mixed with the Naturally Nude lipstick because I feel like it doesn't have enough brown in it. I actually think it doesn't have any brown tones in it so it's a little too pink for my taste. 

All in all I would recommend these lipsticks. They don’t feel dry on your lips but you have to reapply them every 1-2 hours if you want them to be as intensive as when you applied them. If you have to choose only one color try Perfect Red.

 I would give the Avon Ultra Color Lipstick from 1-5 a solid 4.  

I assume you can order them online from here: https://www.avon.com/product/50841/ultra-color-lipstick

Makeup Monday

Contouring and highlighting
If you are one of those girls who is really into makeup you have probably heard about the importance of contouring and highlighting a million times and if you are one of those girls who is like what is she talking about?-.^, let me tell you that in my opinion the first thing someone should learn about how to do their makeup is how to contour and highlight. If you ask me you don’t need smoky eyes or winged eyeliner  to look gorgeous you just need to contour and highlight right and learn how to do your brows too. So today I am going to teach you the basics of highlighting and contouring so you can get that famous Kim K face.
Your face is your canvas and I am going to teach you how to paint it right. First thing you need to know is that with contouring we sharpen so it means that we minimize: we minimize our nose, we shorten out forehead, we make our face appear thinner etc. We highlight where the sun would naturally hit us but keep in mind that highlighting can emphasize some tings on our face. YOU NEED TO REMEMBER THAT YOU NEED TO ADJUST THEM SO THEY CAN FIT YOUR FACE’S FEATURES.  For example if someone has a big forehead they need to bring the contour more closer to their eyebrows and highlight just a little bit between them and above them so their forehead appears smaller, but if someone has a small forehead they need to keep the contour close to their hairline and not bring it down and they need to highlight from the eyebrows up in the middle of their forehead so their forehead appears bigger. So I found a picture of this girl and I tried to illustrate you where to contour and where to highlight (p.s. sorry if you think it’s bad but I tried)

So the highlight is where the sun hits us and the contour is the shadow it creates.
·      -   Contouring
We are contouring our forehead, cheekbones and our chin with the famous 3 contouring( starting from the forehead and ending with the chin you draw the number 3 on your face). Your cheekbones contour should start from the middle of your ear and follow a straight line to your mouth angels. But just because it needs to follow this line it doesn't mean that you should contour down to your mouth,  you should focus the contour close to your ear and not bring it down further than a middle or 1/3 of your cheek. When you are contouring your chin, don’t forget to contour your neck so you would have an even skin tone. If you want to make your nose appear thinner contour the sides of the bridge of your nose and if you want to give some more shape to the tip of your nose than contour it too. If you are not applying eyeshadows contour your crease.
·     -    Highlighting
You need to highlight under your eyes in the triangle shape so you would bring that highlight on your checks. Highlight the bridge of your nose and your forehead. To make your lips appear bigger highlight your cupid’s bow. Highlight above and under your eyebrows to give them more shape and make your eyes appear bigger. Don’t forget to highlight the inner corner of your eyes.
-Apply the blush on your checks between the contour and highlight.

To achieve all these things there are two ways:
1.      You bye two foundations one one color lighter and the other one one color darker than your skin tone. You apply the lighter one where you like to highlight and the darker one where you want to contour and than you blend them together with a brush or sponge.
2.      You put a foundation that is the same color with your skin tone on your face and than with a concealer that is one shade lighter than your foundation you highlight all the areas that you want and with a bronzer you contour.
Keep in mind that you want to keep your contour matte and you are allowed to have some sparkle in your highlight. However my tip for you would be highlight with matte concealer and than you can put on your cheeks and cupid’s bow some of those highlighters. You can use a glitter eyeshadow under your brow and on your inner corner. Your blush doesn't have to be matte.


Makeup Monday (македонски)

 Контурите во шминкањето
За успешен завршен резултат првото нешто што една девојка треба да го знае е како со помош на шминката да ги истакни убавите црти на своето лице,а да ги сокрие и промени оние кои не и се баш омилени. Вашата шминка не може да биде успешна доколку не знаете како правилно да го нашминкате вашето лице. Стојам зад тоа дека не ви требаат ниту мачкестите очи, ниту познатиот smoky eye за да изгледате фантастично, се што ви треба е да знаете правилно да го осветлувате и затемнувате вашето лице и да знаете како да ги пополувате вашите веѓи.
 Шминката е тајното оружје на секоја жена/девојка, со помош на техниката за осветлување и затемнување вие можете да манипулирате со вашето лице.  Многу важно е да знаете дека иако е универзално за сите кои делови од лицето треба да се осветлат, а кои затемнат за постигнување на познатиот Kim K изглед, оваа техника мора да ја адаптирате според вашето лице. На пример: Девојка која има големо чело треба да затемнува на нејзиното чело од линијата каде и почнува косата и затемнувањето да го приближи не премногу, но сепак доволно блиску до веѓите, а да осветли само меѓу нив и над нив. Додека девојка која има мало чело треба затемнувањето на своето чело да го направи блиску до линијата на нејзината коса,а остатокот од нејзиното чело да го осветли. Ова е вака бидејќи со затемнувањето креираме сенки на нашето лице и со тоа ги смалуваме некои од деловите на нашето лице (помал нос, потанко лице, помало чело и с.л.). Осветлувањето се прави на деловите од лицето кое сонцето нормално би ни ги осветлило, но има тенденција да ги зголеми некои работи на нашето лице. Можеби веќе сте виделе некоја од овие слики, но на сликата која ја најдов од оваа девојка се потрудив да ви направам илустрација за полесно да го сватите се ова за што ви пишувам(се извинувам ако е лоша илустрацијата, стварно се потрудив J)
Значи осветлувањето ни е Сонцето, а затемнувањето ни се сенките кое Сонцето ги создава на нашето лице.

·         Затемнување
Ги затемнуваме нашето чело, образи и брада со помош на затемнувањето во вид на бројот 3(започнуваме од челото,а завршуваме со брадата исцртувајќи 3 на нашето лице( од двете страни)). Затемнувањето на нашите образи започнува од висина на средината на нашето уво, а следи права линија до аглите на нашата уста. Фактот што ја следи оваа права линија, никако не значи дека затемнувањето треба да биде до нашата уста. Главно треба да се задржите во близина на увото, а линијата да зафаќа  1/3 до половина од вашиот образ. Кога ја затемнувате вашата брада, не заборавајте затемнувањето да го продолжите на вашиот врат затоа што во спротивно ќе имате нееднаков тен. Доколку сакате да го стесните вашиот нос затемнете ги  страните на коската, а доколку сакате да му дадете повеќе форма на крајниот дел од вашиот нос затемнете го и него. Доколку не користите сенки затемнете го делот од капакот кој се собира кога ќе го отворите окото.
·         Осветлување
Oсветлете под вашите очи во форма на триаголник за да ги осветлите и вашите образи. Осветлете ја средината на коската од вашиот нос помеѓу двете затемнати лини кои ги направивте. За да постигнете изглед на поголема уста осветлете ја дупката на вашата горна усна. Осветлете над и под вашите веѓи за да им дадете поубава форма и да ги направите вашите очи поголеми. Не заборавајте да ја осветлите средината на вашето чело и внатрешниот агол на вашите очи. Екстра совет: осветлете под затемнувањето на вашите образи за поистакнати јаболчници.
·         Вашето руменило ставете го на вашите образи помеѓу затемнатиот и осветлениот дел.
За да го направите сето ова во практика постојат два начини:

  1.            Купете две течни пудри: едната за една нијанса посветла од вашата кожа, а      другата за една нијанса потемна од вашата кожа. Потемната пудра ставете ја на деловите од лицето кои сакате да ги затемните, а посветлата на оние кои сакате да ги осветлите и на крај соединете ги на вашето лице со помош на четка или сунгерче за пудра.
  2.         Ставете пудра што е иста нијанса со вашата кожа на целото ваше лице. Со помош на коректор ( англиски concealer, не corrector( тоа се два различни продукти за шминкање)) кој е за една нијанса посветол од вашата пудра, осветлете ги оние делови на вашето лице кои сакате да ги осветлите, а со помош на bronzer затемнете ги оние делови од вашето лице кои сакате да ги затемните
Запомнете вашето затемнување  да остане матно, а во вашето осветлување може да има сјај/светулки. Моја препорака за вас е и осветлувањето и затемнувањето да ги направите со мат продукти, а доколку сакате да му дадете сјај на вашето лице да ставите од познатите highlighters на вашите образи и светликава сенка под вашите веги и во внатрешниот агол на  вашите очи. Вашето руменило може да биде и мат и сјајно во зависнот од тоа како вие го преферирате.
П.С. Некои зборови од англиски се потрудив да ги преведам најлогично што можев на македонски (contour- затемнување, highlight-осветлување и др.), а сметам дека за некои производи како bronzer и highlighter нема соодветен превод.